Using Your Scan Mat
STEP 1: SETTING UP YOUR SCAN MAT
- Place your mat on the floor so you can easily hold your camera at least 40” above your mat.
- Make sure all 4 corners of your mat are flat. If curling, use weights or tape to hold each corner down.
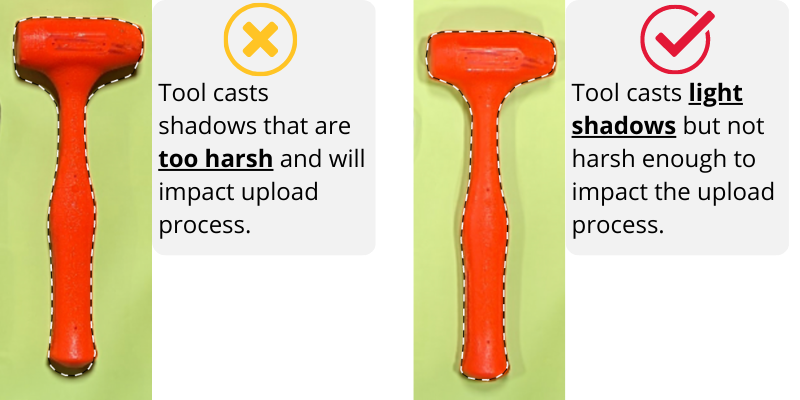
- Setup in an environment that encourages a clear contrast between your tools and the scan mat. Avoid lighting that'll cause your tools to cast harsh shadows.

Keep seeing strong shadows? If you already have natural light in the room, try turning off the lights. If the strong light source is coming from a window, adjust curtains or blinds to angle the light in a different direction.
STEP 2: PLACING TOOLS ON THE MAT
Remember - Your tool layout on the mat does not need to reflect your desired placement in the foam. You can modify the placement of each tool once the upload is complete.
- Make sure they have at least ½” of space between each tool on the scan mat. This helps the MyToolFoam editor’s ability to clearly distinguish different tools in your upload.
- If you are adding sockets to your foam insert, use our pre-loaded socket library. (Link - See How)
- Be sure you don’t have any of the scan mat border icons partly covered, the system needs an unobstructed view of the icons to complete the upload process.
USING SUPPORT CLAY
Use support clay from your Scan Mat Kit to prop up items like wrenches so they sit upright on your scan mat.

PRO TIP - Place the support clay in a similar spot on the tools so you can use the finger grip tool in the editor to overlap any bumps caused by the clay.
STEP 3: CAPTURING YOUR TOOLS ON THE MAT
Remember - You can upload as many times as you want! It is better to upload 2 or 3 great photos of your tools versus 1 photo with everything smushed together.
- Have your camera at least 40” above the Scan Mat. In general, the more tools you have on your mat, the higher you want to hold your camera to reduce any potential parallax errors.
- Make sure your camera is parallel to the ground and directly over the mat's scanning area.
- You should see your feet in the bottom of your photo when at the correct height and angle.
When taking your photo, remember the phrase: “It’s neat to see your feet”.
PRO TIP - If you're having trouble taking the photo at the correct angle, try turning "grid mode" on your smartphone for an additional aid on your camera's screen.

